How do I take off?
If you've never done it before, taking off can be quite a challenge. You need
to keep control of your craft, and at the same time keep good awareness of where
you are and what you are doing. Once you've lost your sense of direction, it can
be pretty difficult to recover at first. But with a bit of practice, it can
become second nature.
Choosing a spacecraft
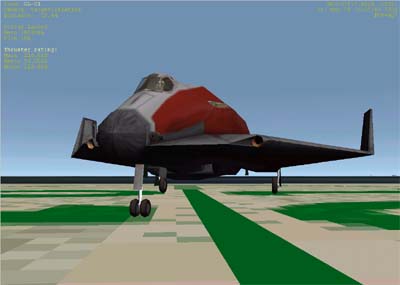 If you've never taken off before, try using one of the futuristic craft
either the Deltaglider or the ShuttlePB. The skills you need are pretty much the same
as you need for the more realistic spacecraft like the space shuttle, but they
are more forgiving for the beginner. If you can achieve a neat and tidy takeoff
with one of these, your chances of succeeding with the shuttle later will be
pretty good. On the whole I'd recommend the deltaglider because of its
easy-to-use panel.
If you've never taken off before, try using one of the futuristic craft
either the Deltaglider or the ShuttlePB. The skills you need are pretty much the same
as you need for the more realistic spacecraft like the space shuttle, but they
are more forgiving for the beginner. If you can achieve a neat and tidy takeoff
with one of these, your chances of succeeding with the shuttle later will be
pretty good. On the whole I'd recommend the deltaglider because of its
easy-to-use panel.
The essential controls
One of the most useful keys for takeoff is the '5' in the middle of the
number pad on the right of your keyboard. This is the 'Kill Rotation' key.
During takeoff, this key is very useful if you find your spacecraft wandering in
a direction you don't want it to. Often the easiest way to change your
orientation is to start a change with either your joystick or the arrow keys on
the keypad, and finish it with a touch of the 'KillRot' key.
The other useful number pad keys are
- 2 - 8
- 4 - 6
- 1 - 3
- Ctrl + and ctrl -
- *
- 0 - .
|
Pitch up and down
Roll left and right
Yaw left and right
Main and retro engines
Kill main/retro thrusters
Hover engines up and down |
You can just as easily use a joystick for these operations, or the buttons
you can see on the deltaglider panel. There is far more detail about controls in
the manual, which you can find in the doc folder of your orbiter installation.
Before takeoff
You will need to use the multi-functional displays (MFD's) to navigate. In
the deltaglider, just select what you need on the two viewscreens. On any other
ship, you will need to select what you need using the keyboard. The one's you
will need here are
| MFD |
Selection key |
| Surface MFD |
Shift-S |
| Launch/Land MFD |
Shift-L |
| Orbit MFD |
Shift-O |
Your keyboard has two shift keys, and the MFD will come up on the left or the
right depending on which one you use. There are more MFD's, and in the long run
you'll want to use them all. You'll find all you need to know in the manual.
Before departure, change the MFD's so you have the surface MFD on one side,
and the orbit MFD on the other.
The orbit MFD also has a couple of modes which you must select correctly in
order to take off.
| Shift-P |
Change projection - there are three choices, ecliptic, ship
and sometimes target. Choose ship to take off. |
| Shift-M |
Selects the display mode. Choose the one with the diagram
and the numbers. |
| Shift-T |
Adds a target. Essentially this adds the orbit of another
body onto your orbit graph. Don't select one for now. |
The surface MFD has quite a few useful pieces of information.
Pitch is the angle of the nose above the horizon.
Heading is the compass bearing which the nose is pointing to
Roll is the angle of the wings to the surface. Most of the time this should be
flat during takeoff. You can use this to turn the deltaglider like an aeroplane.
It also states your vertical and overall speed relative to the surface.
What is a takeoff?
The familiar picture of a space rocket roaring straight up into the sky
can give the wrong impression. The main task ahead of you is to boost your speed
sideways up to around 7.7 kilometres per second. Sideways speed is what's
needed, not upward. The only reason that spacecraft go up at first is that the
Earth's atmosphere prevents movement at high speeds. We therefore start by going
upwards to get out of the atmosphere, because while we are in the thick of it,
it's impossible to reach the speeds we need. But as soon as that's no longer
true, our emphasis should shift to accelerating sideways, and our vertical speed
should actually drop.
Fortunately for us, the atmosphere thins out quickly with altitude. Roughly,
it halves in density every 5 kilometres. This thinner air provides less
resistance to motion. In practice, from about 60 kilometres upwards, it becomes
possible to accelerate to speeds that are substantial fractions of the speed you
need. At around 140 kilometres up, air resistance has dropped to the point where
it is possible to orbit the Earth.
Your aim at takeoff is to get into a low, more or less circular orbit a
couple of hundred kilometres above the Earth. The orbit MFD, now it's set up
correctly, will show you how you are getting on.
Because the Earth rotates, you are already traveling east at around 400
metres per second. We shall therefore accelerate eastwards when we get the
chance, to build on the head start that the Earth has given us.
Stage 1 - Getting off the ground
Fire the hover engines, retract the undercarriage (G) and, when safely clear
of buildings, fire the main engines - full power. Pitch the nose up, and get
onto an Easterly (90') heading. Once the nose is safely up, get the hover
engines off. Aim to get the nose up to at least 70'.
Stage 2 - Up through the atmosphere
As you go up through the atmosphere at this high pitch, you speed will slowly
rise. The slowness is significantly due to the drag of the surrounding air. As
you rise and the air thins, your speed will increase, and so will your
acceleration. Let your vertical speed (VSpd on the surface MFD) climb to over 500 metres per second. Once
you reach this point, you can start to lower the nose. Reduce pitch to around 50'
nose-up at
first.
Stage 3 - Above the atmosphere - now is the time to accelerate
Above about 70 kilometres, you can reduce pitch so that your vertical
acceleration (VAcc on surface MFD) is slightly negative. Somewhere
between -1 and -2 ms^-2 is good -
you can vary this a bit depending on how high an orbit you want to get into. You
can let this wander a bit, but try and keep it between -1 and -2. I think that the
easiest way to do this is to use 8 and 2 (and 5) on the Numpad. This will ensure
that you are at least 140 kilometres up before you stop rising
altogether. Keep the engines on full power accelerating on your eastbound
heading as fast as possible. At this point, you should start to see your orbit
in the orbit MFD getting fatter and fatter.
Once your vertical speed gets to zero (which it should), you should try to
keep it there or thereabouts. Use pitch to control your vertical speed whilst
you accelerate. As you accelerate, you will need to lower the pitch
progressively.
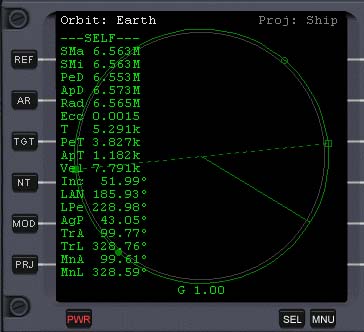 Finally, you will see your orbit in the orbit MFD rise above the circle of
the Earth's surface everywhere. Once you are happy with your orbit, switch the
engines off. A good orbit looks like the one on the right.
Finally, you will see your orbit in the orbit MFD rise above the circle of
the Earth's surface everywhere. Once you are happy with your orbit, switch the
engines off. A good orbit looks like the one on the right.
Coping with mistakes
If you accidentally find your spacecraft spinning off in totally the wrong
direction, you can usually recover yourself in one of the futuristic craft. Just
press 'killrot', reorient yourself, and carry on. You will have wasted some
fuel, but you probably won't crash, and should have no problems achieving orbit.
The other thing that may happen is that you end up with an eccentric orbit
which goes high above the Earth's surface in one place, but still dips below it
in others. This is what you will get if you don't control your vertical speed
properly. However, all is not necessarily lost. Switch off the engines and coast
round to the top (apoapsis) of your orbit. There, use the prograde
autopilot ('[' key), and fire the main engines again, and you can raise
the low part of your orbit as far as you want.
In realistic spacecraft, you won't have the fuel to do these things, but it's
OK to do this while you're learning.
Home